Armadillo Enviro Scripter Help
Three New Environment Packs!! Thanks Fixer!! :-)
Download Serengetti Pack
HERE
Download Snow Forest Pack
HERE
Download Tropical Pack
HERE
Download Armadillo Enviro Scripter (AES) v1.1
HERE
Download 3dsMax "Cast Shadows Only" Plugin
HERE
Download Forest Pack
HERE
Download Desert Pack
HERE
Download VB 6.0 Runtime (if necessary) HERE
| Index | ||
|
Overview Installation and Setup Buttons and Controls How To Use Credits |
The Armadillo Enviro Scripter (AES) utility was designed to give MCM2 track
creators the ability to render environment shadows on their textures in 3dsMax.
The program works by building the necessary 3sdMax scripts used to merge and place
the environment objects into your Max scene. Once these scripts are executed, the
Max scene can then be rendered giving accurate shadows for the track in MCM2
(assuming care was taken in aligning the light sources. See the MaxCalculator
program for assistance).
Since the Armadillo program was first released by Rainbow Studios, I have always
felt "short changed" in what we could do when creating tracks. This motivated me
to make efforts on expanding the horizons for MCM2 track creations. This program
is just another step along the way, I hope you enjoy it. As with most of my
programs, explicit knowledge of MCM2, Armadillo, and 3dsMax are required
attempting to use this program.
Overview
Installation and Setup
Armadillo Enviro Scripter (ArmadilloEnviroScripter_v1.zip)
ArmadilloEnviroScripter.exe - Main
program; requires VB6 Runtime installed. Extract to any folder.
AES_Help.html - AES Help file. Extract to
any folder.
AES_01.jpg - Picture for Help file.
Extract to same folder as Help file.
AES_02.jpg - Picture for Help file.
Extract to same folder as Help file.
C2SE_MaxView.jpg - Picture for Help file.
Extract to same folder as Help file.
** NOTE: If you try to run the program and you get an error message
then you need to install VB6 Runtime. If you've already installed this
and the program still won't run, send me and email and I'll give you a
link to the program that includes an installer (about a 5MB zip file).
You can email me at: jhamblin0@aol.com
3dsMax "Cast Shadows Only" Plugin (ShadowPlugins.zip)
shadow.dlt - Extract to 3dsMax plugins
folder. Requires 3dsMax 3.1.
BlurLib.dlu - Blur Library file for
shadow.dlt plugin. Extract to 3dsMax plugins folder. Requires 3dsMax
3.1.
Forest Pack (ForestPack.zip)
- Contains all the vegetation Max files for the MCM2 Forest (and Snow
Forest) Environment. All objects are created at their full size (in
feet).
- You can extract to any folder, but usually naming the folder
"Forest" is helpful.
*** Once extracted you MUST update the Max file by doing the
following: ***
*** You MUST do this for EVERY Max file in the Environment Pack or you
will have problems later on. ***
Desert Pack (DesertPack.zip)
- Contains all the vegetation Max files for the MCM2 Desert (and Dry
Desert) Environment. All objects are created at their full size (in
feet).
- You can extract to any folder, but usually naming the folder
"Desert" is helpful.
*** Once extracted you MUST update the Max file by doing the
following: ***
*** You MUST do this for EVERY Max file in the Environment Pack or you
will have problems later on. ***
Buttons and Controls
-
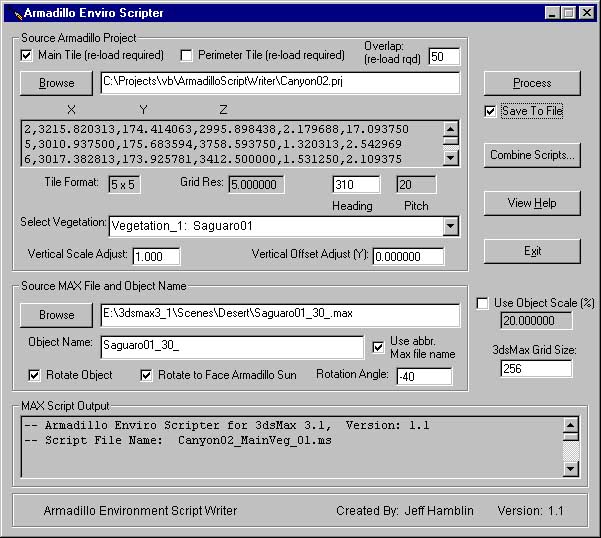
Source Armadillo Project
-
"Main Tile" - This is check box is the
default when the program is executed. When checked, this will direct
the AES program to generate scripts for the Main Tile(center) of
your Armadillo project. Unchecking the box will require a reload of
the project if it is already loaded.
-
"Perimeter Tile" - Checking this check
box will direct AES program to generate scripts for the Perimeter
Tile(s) of your Armadillo Project. Checking this box will require a
reload of the project if it is already loaded.
-
"Overlap:" - This control is useful if
you have used a placement map to tile the environment everywhere on
your track. Changing this value to something greater than the
default of zero will direct AES to import the environment just
outside of the tile so that partial shadows along the edge will be
generated in Max. The overlap number varies with every track but a
good number to start with is 50. Changing this setting will require
a reload of the project if it is already loaded.
-
"Browse" - Used to open your Armadillo
Project.
-
"X Y Z Display Window" - Used as a
reference to display the Environment TXT file of your Armadillo
Project.
-
"Tile Format:" - Used as a reference to
display the tile format of your Armadillo Project.
-
"Grid Res:" - Used as a reference to
display the Grid Resolution of your Armadillo Project.
-
"Heading" - An optional control used to
change the light source direction read from your Armadillo Project.
In most cases this value is left "as is" from the Armadillo Project.
-
"Pitch" - Used as a reference to the
light source pitch of your Armadillo Project.
-
"Select Vegetation" - A control used to
select the Armadillo vegetation you will be making a script for. It
is important to note that you will be making an individual script
for each and every vegetation type within your Armadillo Project. A
drop down selection list allows you to select the desired vegetation
type.
-
"Vertical Scale Adjust" - An optional
control used to vary the vertical placement of the environment
objects in 3dsMax. This is normally set to one(1.0) unless your are
attempting something tricky.
-
"Vertical Offset Adjust" - An optional
control used to vary the vertical placement of the environment
objects in 3dsMax. This is normally set to zero (0) unless you are
attempting something tricky.
-
Source Max File and Object Name
-
"Browse" - Used to point to the Max
file for the selected vegetation type.
-
"Object Name" - Used enter the 3dsMax
Object Name. It should be noted that it is convenient to keep the
object name the same as the 3dsMax file name.
-
"Use Abbr. Max file name" - Check box
used to automatically insert the abbreviated 3dsMax file name as the
object name.
-
"Rotate Object" - Check box that
enables object rotation controls on AES user interface.
-
"Rotate to Face Armadillo Sun" - Check
box that automatically sets the Rotation Angle to face the light
source (sun) in Armadillo.
-
"Rotation Angle:" - Control that allows
setting the relative rotation angle of the environment object being
merged in the Max script. This rotation angle is about the Z axis in
3dsMax.
-
MAX Script Output
-
Max Script Output Window - Used as a
reference to view the Max script generated by AES.
-
Main Controls
-
"Process" - Control button that directs
AES to generate to the Max script.
-
"Save to File" - Check box that when
checked saves the output script to a file. Unchecked provides a
means for previewing the output before actually saving it.
-
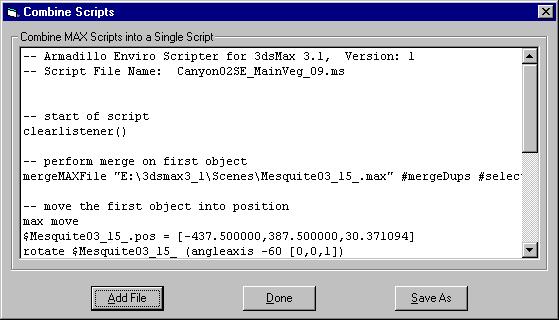
"Combine Scripts..." - Launches a pop
up window that allows you to combine many environment scripts into
one large script for 3dsMax.
-
"View Help" - Used to launch this Help
file.
-
"Exit" - Used to quit the AES program.
-
"Use Object Scale (%)" - Check box that
when checked allows you to scale the objects to match the scale of
3dsMax scene. The default is 100% which assumes that the objects and
3dsMax scene are created at actual size. The resulting 3dsMax grid
size is calculated and displayed in the 3dsMax Grid Size field.
When the Use Object Scale check box is unchecked, the 3dsMax Grid Size field becomes a control to enter in the grid size of your 3dsMax scene. You normally would use this if you have already created the 3dsMax scene and know the grid size. In this situation the the resulting object scale is displayed under the Use Object Scale check box.
How To Use
- Run the ArmadilloEnviroScripter.exe program and open your PRJ file. This will load all of the project data.
- On "Select Vegetation" click the down arrow and click on the first vegetation.
- Browse for your vegetation Max file and select the one that matches the vegetation name.
- Click the check box for "Use Abbreviated Max file name" and the object name will be automatically filled in.
- Click the check boxes for "Rotate Object" and "Rotate to Face Armadillo Sun" and the Rotation Angle field will be automatically filled in. Because these trees are just billboard signs, you need to always rotate them to face the sun.
- Click the "Process" button and the script shown in the output display will be written to disk. You will need to create a script for every vegetation in your track.
- When all the scripts have been made, use the Combine Scripts function to combine all the scripts into a single script file.
- In 3dsMax, click on the Utilities tab (hammer) and click on MaxScript. Click on RunScript and browse for your script file.
- Open your script file and let it go!
When you are finished, your Max scene should look similar to the one in this picture. (without the objects for now. This will come in another program.)
** NOTES: In 3dsMax you want to use the Target Direct light source and make sure that the cone is large enough to encompass the entire terrain. Set the HotSpot and Falloff to approximately the same number. Also make sure you have RayTracing ON in the light source and when rendering. Because the tree/shrub objects are flat, an overhead light source will not produce correct RayTraced shadows. You want to have the light source lower in the sky, approximately 45 degrees or less should work well.
Top of PageCredits
I as well as the rest of the Twisted DIRT team hope that you find this utility useful in making the highest quality textures possible for your tracks.
Your feedback is important! Please send all comments, questions, and suggestions to:
Jeff Hamblin (VRT_MCMnut)
jhamblin0@aol.com
You can also visit the message boards at Twisted DIRT and let us know what you what you think. Thanks!
Top of Page