
SLT_Assistant Help
| Index | ||
|
Overview Utility Buttons and Controls Adding A Second Level Of Detail To An Object Sample LOD Models Credits |
The SLT_Assistant utility is designed to aid in the editing tasks necessary when
fine tuning custom objects for Motocross Madness 2 (MCM2). It also gives the
ability to build a second level of detail (LOD) into MCM2 objects that was
previously only available to the game designers: Rainbow Studios. Since this
utility is based off of undocumented information, and no further assistance can
be acquired through Rainbow Studios, this help file will not try to explain
every aspect multiple LOD objects and will only act as a guide for using the
utility. This utility and help file assumes previous knowledge of how to use and
design custom objects for MCM2.
Overview
Utility Buttons and Controls
-
Source SLT File: LOD 0
-
"Browse" - Used to open your high detail
SLT file (LOD 0). Once opened the complete file name including the path
will be displayed.
-
LOD 0 Data:
-
"TextureMap" - Displays the current Texure
Map file name for your object.
-
"Browse" - Used to select a new Texture Map
file for your object. This can be very useful when reskinning an object
to make a new one.
-
"ColorKey" - Used to view and adjust the
ColorKey setting (if exists). Valid entries are RGB values from 0 to
255. If the ColorKey statement does not exist, you will have the option
to add it by clicking on the "Add ColorKey" checkbox.
-
"Color Sample" - Shows the RGB value of the
ColorKey setting.
-
"Number Of LOD" - Shows the number of LOD
contained in the source SLT file. If the number of LOD is 1, you will
have the option to add a second LOD by clicking on the "Add LOD 1"
checkbox.
-
Source SLT File: LOD 1
-
"Browse" - If available, is used to open
your low detail SLT file (LOD 1). Once opened the complete file name
including the path will be displayed.
-
Advanced Settings...
-
"AutoLOD#0" - Used to view and adjust this
setting. CAUTION: No documentation exists for this setting. All values
must be tested through trial and error.
-
"AutoLOD#1" - Used to view and adjust this
setting. CAUTION: No documentation exists for this setting. All values
must be tested through trial and error.
-
"Use Default" - This button loads the
default values which approximate the settings used by Rainbow in most of
their stock objects.
-
Main Buttons
-
"Save As" - Used to save the changes to a
new or existing SLT file.
-
"View Help" - Used to view this help file.
-
"Exit" - Used to quit the program. CAUTION:
You will NOT be prompted to save your changes if you click this button.
Adding A Second Level Of Detail To An Object
I will not attempt to explain the process of designing and exporting a custom object using 3D Studios MAX, but basically what you need to do is export two versions of your object: A high detail SLT file and a low detail SLT file.
The high detail SLT file is referred to as LOD 0 by MCM2 and is the one displayed when you are very close to the object and/or you have the graphics quality turned way up. This version of the object typically has a high poly count since you're looking for good detail.
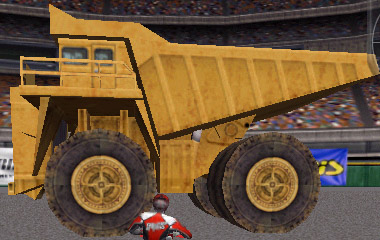
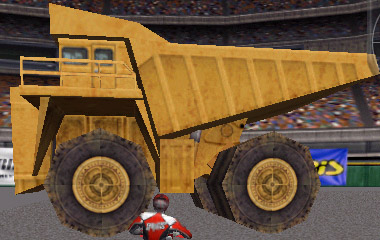
The low detail SLT file is referred to as LOD 1 by MCM2 and is the one displayed when you are further away on the track and/or you have the graphics quality turned down. This version of the object will typically have a lower poly count since you aren't really concerned about the detail when further away. The following two pictures demonstrate this concept with a stock MCM2 object:
 |
 |
The beauty of the two LOD design is that you get the best of both worlds: high detail up close and better frame rates when further away (typically when racing the track). For complex objects, this method could certainly make the difference between an unrideable and rideable track!! Although it does require extra time and planning during the object design stage, the benefits to all are well worth the effort!
Top of PageSample LOD Models
Located in the folder where you installed this utility you will find the following sample files:
- SampleSemi.SLT - Semi Truck object with two LOD
- SampleSemiLOD0.SLT - High detail (LOD 0) Semi Truck object only
- SampleSemiLOD1.SLT - Low detail (LOD 1) Semi Truck object only
- SampleSemi.tga - Texture Map file for Semi Truck object
- SampleSemi_art.tga - Art file for Semi Truck object
These samples are provided for learning how to use this utility as well as for use on MCM2 tracks. As with all custom objects, rename and reskin them as you wish but please acknowledge who provided them to you. Enjoy!! :-)
Top of PageCredits
This utility was designed by Twisted DIRT member Jeff Hamblin (VRT_MCMnut) with the guidance of Bruce Atkinson (AMA_DirtTwister). We hope that you find this utility helpful and use it to its fullest potential on custom objects for MCM2.
I would like to take this opportunity to thank our Twisted DIRT 3D Studio MAX guru, Fraser, for his help with building the two LOD models for this utility.
Your feedback is important! Please send all comments, questions, and suggestions to:
Jeff Hamblin
jhamblin0@aol.com
You can also visit the message boards at Twisted DIRT and let us know what you what you think. Thanks!
Top of Page