Building a Training-Practice Supercross Track
Latest revision, update, or addition: October 18, 1999
In this chapter you will learn the vital role and the importance that a well designed and constructed practice and training track brings to your racing career and success. The guidelines, type of planning, and route a champion must follow to become highly successful. And the attitudes and behaviors the potential champion must grow, develop, and evolve into to accomplish his “Racing Dreams.”
In this chapter, as in all chapters, as you read, take notes in your book. Also, “Hi-lite” any or all areas you find helpful, beneficial, and/or useful for advancing your “Racing Mind,” your “Thinking Process,” and how you “Apply It.” In this way, you will be able to do both: study and review this material at a much faster rate, and be able to re-locate and/or recall this material at a much faster rate at later dates. Pay careful attention to all bold print and underlined words.
Before we start this chapter let me leave you with this success clue: “Your Thinking Process is your best Success Weapon! Become a great student—always be willing to learn. How you think becomes your direction of growth and development and success in life. The choices you make dictate the life you live.” Become the leader, not the follower. Direct the pathway others must follow.
Planning and problem recognition
I wonder why so many good riders never recognize the need for a well planned and constructed practice and training track to assist them in reaching their racing goals. “Problem Recognition” is truly a major weakness for most people, especially riders. This weak link, without a doubt, has cost many good riders, and potentially great riders, their championships and eventually their careers. This is a hard lesson to learn. It is a problem in our race school, as well. It shouldn’t be, but it is! Why is that? Maybe this chapter can change, influence, and upgrade their “Thinking Process.” Learning to recognize problems before they get started is a real advantage in reaching new goals and heights. But just what is “Problem Recognition”? Let’s start at the beginning.
The first rule of racing deals with “Problem Recognition.” It states: “Always evaluate your performance for weak areas so you can improve them.” Does this statement sound familiar? “The top rider is always compelled to evaluate his performance so he can apply what he has learned. So he doesn’t repeat the problem. And so he can escape into the solutions.” So let me make a vulgar statement that is as true today as it was yesterday: “You need a well planned and constructed practice and training track to properly and purposefully develop your skill levels.” The misconception in the above is that you don’t need a lot of land to do so; you only need a small amount of land.
At some point in your MX racing career development you will decide to build your own Outdoor National (NX), Grand Prix (GP), Arenacross (AX), or Supercross (SX) race track. If you are going to be and stay competitive with the top riders of today you must have your own track to practice on and to stay highly proficient.
The first and foremost theme in any track design is “Safety”! You must be able to train and practice with a minimum “Risk of Injury.” Yet, the practice and training track must be technical.
The racing skill levels required of today’s riders demand accurate and constant practice on tracks designed and built with stadium difficulty, precision, and technical complexities. You may, at first thought, think that building an SX track would be relatively easy and simple. It is not! It is very demanding and requires your absolute attention, creativity, and patience. Accurate and precise planning is the key. Drawing the track out in detail is the first planning step.
If this is your first race track, may I suggest that before you start with yours you first help or work for one of the major track-building companies, such as Stadium Dirt Designs. You will discover, real fast, what to do and what not to do; what comes first, second, and so on; in what order or sequence; what type of dirt to use; how many loads or cubic yards of dirt it takes to build each obstacle; what slope angles are required for takeoff ramps and landing ramps, and when to use or change those angles; how to calculate slope angles; how to tell, show, and mark off obstacles so that heavy-equipment operators can build exactly what the plans, diagrams, or drawings call for; how much dirt costs per load or cubic yard; how to slope or plan water drainage for the land where the track is being built; how to plan and build an underground watering system for your track; zoning for the land; what type of heavy equipment is needed; how much it costs per hour; and how to keep and maintain the track after it is built.
As you can start to understand from the above, planning and building a track to the level that today’s competition demands takes time and money if it is to be done right and benefit you to its highest potential for your success in racing. It is, in any way, shape, or form, not easy. In fact, it is difficult, but worthwhile if done correctly.
Where do we start first? A suitable piece of land is needed first. You may ask, how much land? Today’s stadium SX tracks are approximately 300′ × 300′, or one football field in size. Actually, I have found that you can build an excellent training and practice track on 1.5 acres for NX or SX. But how does a practice Supercross track fit into the total picture of motocross racing?
Cross training
Part of the total picture deals with mixing or cross training Supercross and outdoor cross together in your riding training program. Mixing or cross training both Supercross and outdoor cross is what the top ten riders are presently doing. That is, during the Supercross season, the first practice moto is on an outdoor track. And the second moto is on the Supercross practice track.
During the outdoor season the practice moto order is reversed. That is, the Supercross is practiced first. And the second practice moto is on the outdoor track.
What does this riding cross training accomplish? To answer this question correctly you need to understand what each type of race training develops and demands from its rider.
Supercross lacks the speed found on the outdoor track but it is filled with technical and complicated obstacles. Each obstacle is demanding and requires correct execution in order to enter the next. With obstacles always following, the rider must always be constantly alert, both for the next upcoming obstacles and for other riders. One after another, always one after another, there is no time to rest or let your guard down. Twenty minutes of constant high-energy levels of alertness.
So, negotiating high densities of both track obstacles and other riders determines your race results. In fact, how well you perform the next obstacle is directly influenced by how well you performed the obstacle before it. Supercross demands that the rider make few to no mistakes to keep his speed up during each lap. Hence, Supercross teaches the rider perfection and precision. At no time during each lap can a rider relax, sit back, and coast a few seconds. All obstacles, like jumps, straightaways, whoop-de-dos, or corners, are hooked together. How well you do one is dependent on how well you did the one before it. That is to say, how well you do the straightaway is dependent upon how well you performed the previous corner, jump, whoop-de-do, or tabletop. Supercross teaches you the attitude of mistake-free racing.
Outdoor cross allows a more relaxed style. It is not as demanding. Don’t get me wrong, it is demanding, but to a much lesser extent than Supercross. Outdoor racing is at a much greater or higher speed level than Supercross. Outdoor motos are longer and require a much longer level of endurance energy. Supercross demands a combination of a two-thirds endurance energy level and a remaining one-third power energy level. Supercross motos are about one-half the time of outdoor motos.
Water management and drainage
Water management is very important to your practice track. So before you start building the obstacles on your practice track, take a moment and consider how to drain the rainwater off each raceway, allowing it to drain freely into the alleyways that are between each raceway. The alleyways should drain to a single point—maybe a pond—where you can reuse the water to wet the track when it is dry or dusty. Roads in the USA are sloped at 2% from the middle. Water drains off the road to both sides into gutters or curbs very easily.
Drainage should be calculated before track construction begins. The alleyways are constructed to carry the rainwater away from the straightaways and toward a predetermined place of water runoff and storage. Axton, Virginia, constructed a lake in the middle of the track to catch the rainwater and store it for track-surface watering during races. You may want to consider the construction of a pond at the lowest point on the land where the training track is located. A lot of tracks have gone to this simple solution of water drainage, storage, and a single point of application.
Alleyways depend on the amount taken up by the dirt-fall distance and the width of your heavy equipment. Most tractors are about 7′ wide, but they can go up to 8′ wide if the equipment is larger. I planned my alleyways to be 7′ wide and planned on 10′ total dirt fall, or a total distance of 17′, plus or minus a foot.
Like road highways, the straightaways should be slightly sloped both ways from the midline, to drain rainwater off the raceways and into the alleyways. The slope is approximately 2% on either side of the straightaway’s midline. I used a blade attached to the back of my tractor to make this slope angle.
Dirt-fall angle
Dirt-fall angle is a term used to describe the angle formed when dirt is piled up on top of itself. The dirt-fall angle tells you how much dirt will fall and extend out beyond your straightaway for any specific dirt height. Once you have the angle of dirt fall you can calculate a slope chart that will tell you how much extra width the pile of dirt will need. So, it tells you how much wider your straightaways will be and how much width to plan for your alleyway.
Example: If the straightaways are 20′ wide, and the dirt fall is 5′ wider—remember to calculate 5′ on either side of the alleyway—and you want your alleyways to be 7′ wide, then you should measure 17′ between straightaways.
Summary
In summary, we very strongly suggest you design your practice-training track around “Safety.” Safety comes first. We have always found that “20-20 hindsight” is always a very painful teacher, and that the well-planned 20-20 foresight learning method prevents the 20-20 hindsight method.
Cross training mixes Supercross precision, perfection, and mistake-free racing with outdoors’ speed, long endurance levels, and relaxed atmosphere. If you are going to be competitive and win titles you must have a competitive practice Supercross track. But there is much more to cross training other than just mixing Supercross with outdoor cross.
Straightaways
It would be nice to have a 20′-wide straightaway like the Supercross series has, but the cost of construction will double or triple over that of a 10′-wide straightaway.
However wide you plan to build your practice track straightaways, they must be at least 1½ times wider than your heavy equipment. This is to allow the equipment to run up and down the launching and landing surfaces without being too narrow to roll-pack the surfaces.
- Supercross width: 25′ (3.4 bike lengths)
- Arenacross width: 17′ (2.3 bike lengths)
Arenacross is approximately two-thirds the size of Supercross in track-width dimensions.
Packing the launch and landing surfaces
Rolling the tractor wheels over the top of the jump packs and rounds the sharp peak at the top of the jump. But remember to be very careful when rolling the tractor tires close to the outside edges of the jump. The dirt may give way, causing the tractor to go out of control down the side of the jump and have an accident, even possibly rolling over.
Slope angles and the bike’s suspension
Because of the forward-sloping front-end suspension of the bike, it will manage up to about 32 to 33 degrees of change in surface angle. Thirty degrees is the optimum change in surface angle if that change remains linear. Thirty-degree launch surfaces that curve up go against the bike’s suspension design and can cause it and the rider to loop out. Curving-up launch ramps are dangerous and often cause unnecessary accidents; some result in injury.
Jumps
On a more serious note and caution: remember never to take any jump for granted or get lazy in performing it. Jumping can get you in over your head very quickly. Jumping is a lot of fun, but always take it seriously.
Double jumps
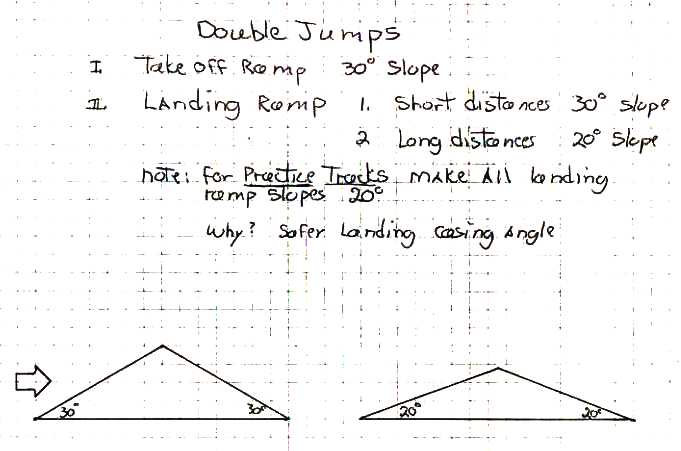
This practice double jump is designed for safety. It has a shorter jumping distance, shallower landing ramp (20 degrees), and a decreased casing angle on the landing jump. Remember, a practice track must necessarily be demanding but designed so that if you make a mistake you have a much lower probability of getting hurt.
When you can display your ability to perform this jump every time, then consider remaking the landing jump from a 20-degree landing ramp to a 30-degree down ramp.
Rocket launch
The standard peak-to-peak distance is 40′ to 45′ and is usually found in the second straightaway on the Supercross track. John Savitskis of Stadium Dirt Designs designed most of the jumps used in Supercross. He created the safer launching and landing angles of 30 degrees, 20 degrees, and 10 to 15 degrees. These angles proved to be safer than the ones used over the previous four to five years, when many top riders were lost to accident and injury by mid-Supercross season.
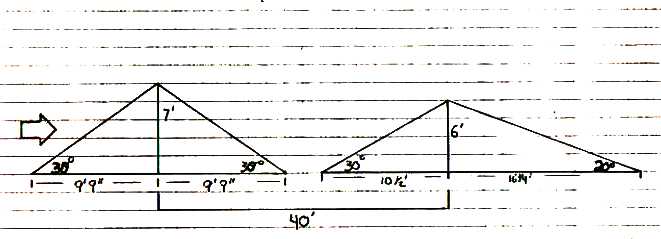
Reverse ski jump
The standard jumping distance is from 25′ to 30′. This is another one of John’s creations. This jump is demanding but can be forgiving if you follow his blueprint design. And it can be a nightmare if you don’t.
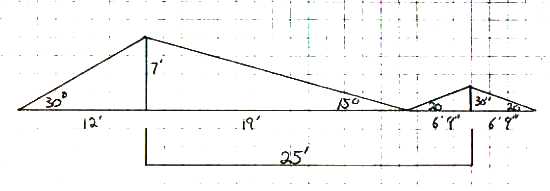
Double- and triple-jump ramp angles
- Launching-surface ramp angles are 30 degrees.
- Landing or casing-surface ramp angles are 20, 15, and 10 degrees, depending on the jumping distance.
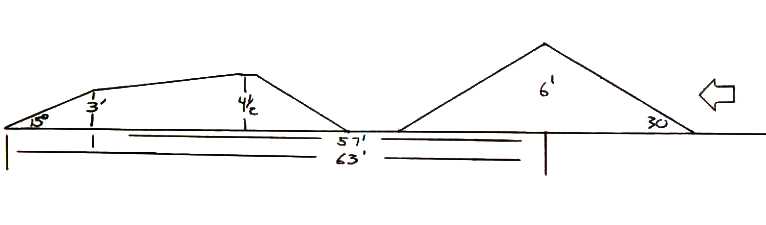
Triple jumps
The takeoff jumping ramp is at or very near 30 degrees. The first landing jump (jump #2) has a 20-degree landing-ramp surface angle. The second landing jump (jump #3) has a 10- to 15-degree landing-ramp surface angle.
The first jump has a standard height of 6′. The second jump has a standard height of 4½′. And the third jump has a standard height of 3′.
Standard peak-to-peak triple-jump distances are:
- From the first jump’s peak to the second jump’s peak: 40′.
- From the first jump’s peak to the third jump’s peak: 65′ to 70′.
However, learning the triple jump requires a lot of time and practice, so I recommend starting with a training triple. Let’s take a look.
The training or practice triple jump
The regular competition distances can be applied to this jump if the rider’s skill level displays the ability to perform it.
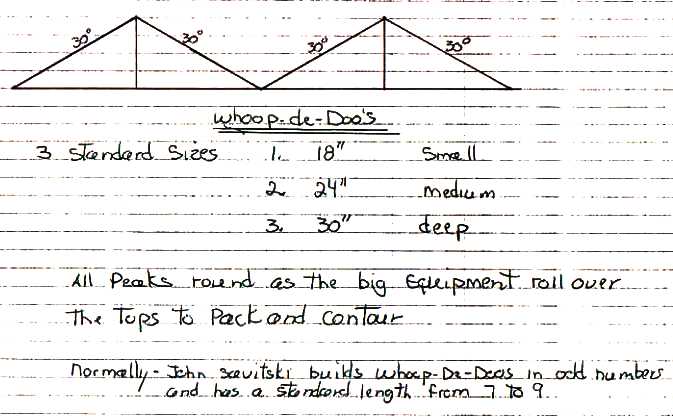
Whoop-de-dos
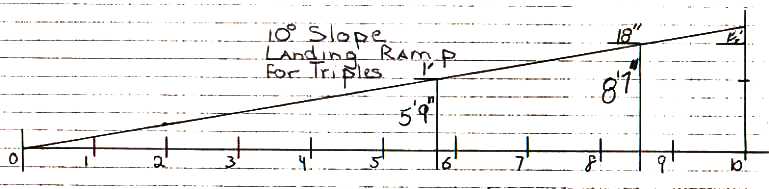
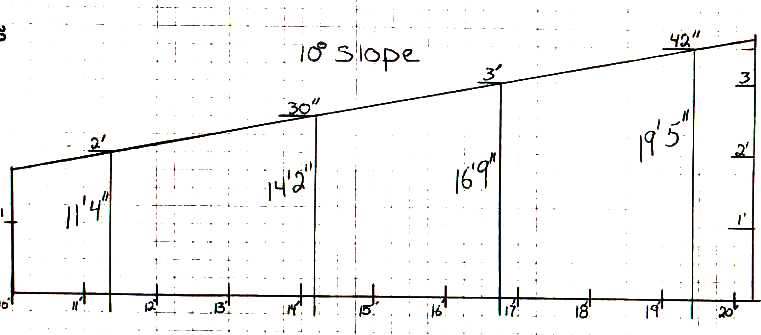
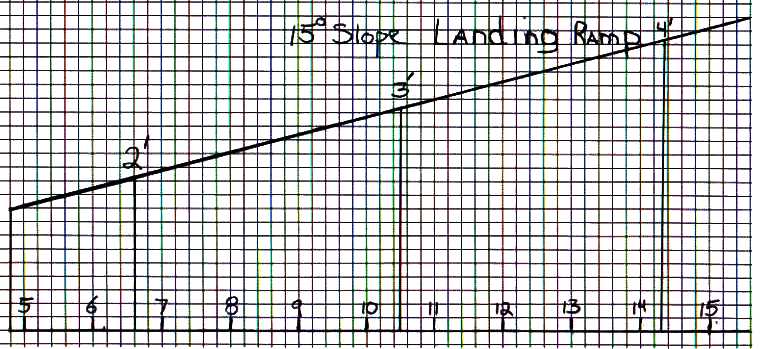
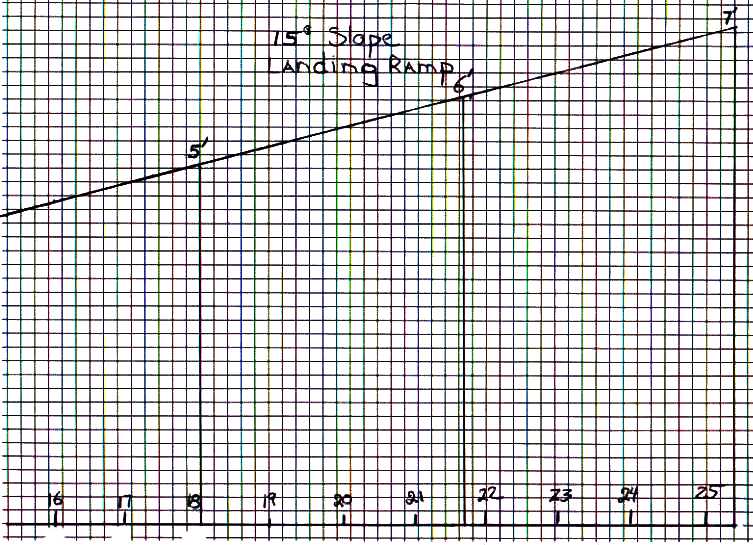
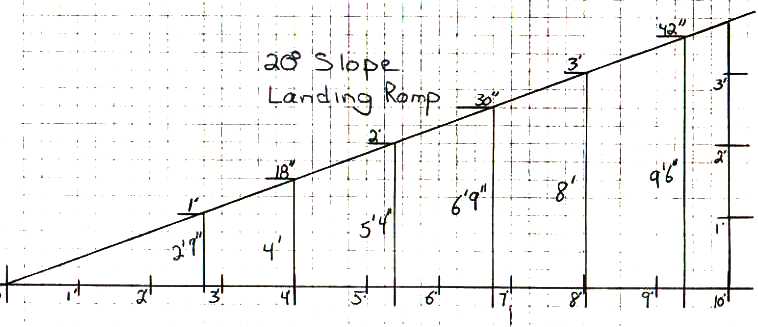
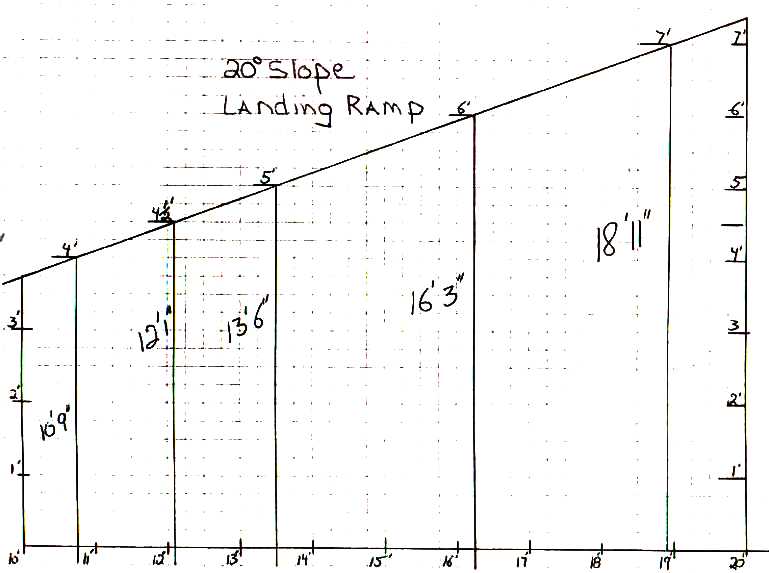
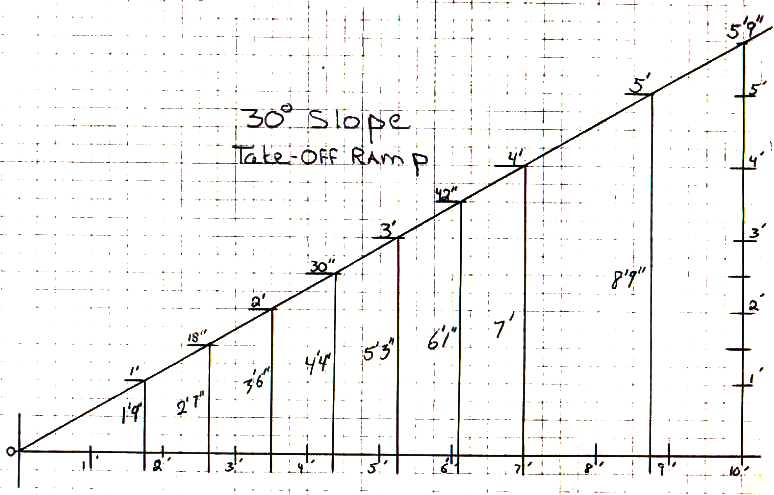
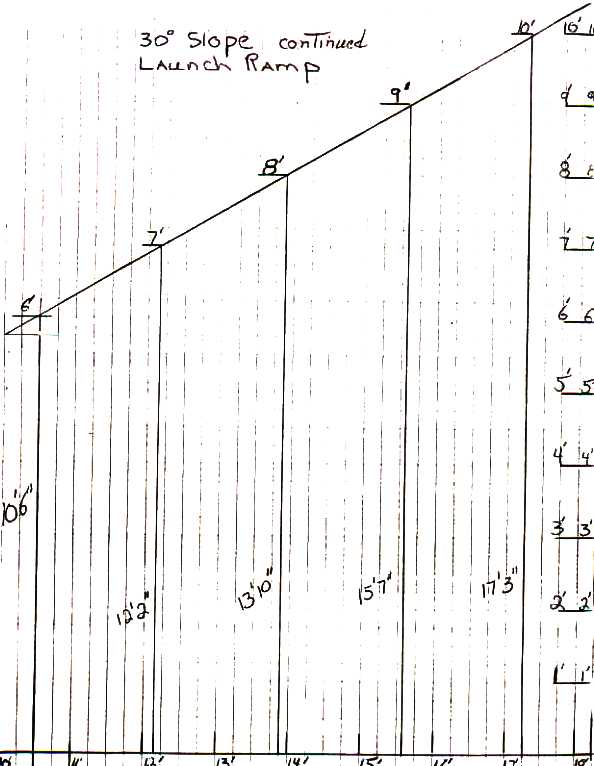
Calculating slope angles for launching and landing
Slope angles are used to construct both the launching and landing ramps of any and all jumps and whoop-de-dos. The longer the jump, the shallower the landing slope. Most double jumps have both a 30-degree launching and landing slope-angle surface. Triple jumps have a 30-degree launching angle, the second jump has a 20-degree landing angle, and the third jump has a 10- to 15-degree landing angle. Slope charts are prepared to construct the jumps more quickly, accurately, and easily.
10-degree slope charts
15-degree slope charts
20-degree slope charts
30-degree slope charts
35-degree slope chart
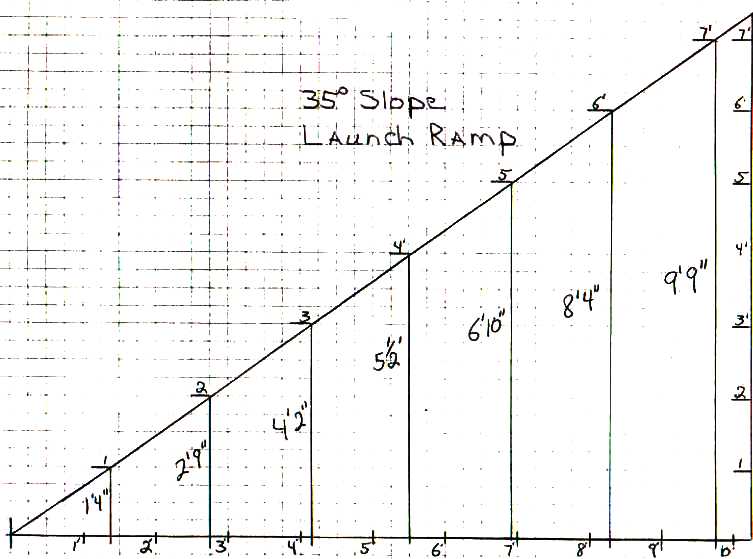
If you need slope calculations for any other slope angle, please refer to a trigonometry math book for the calculations of the needed slope angle.
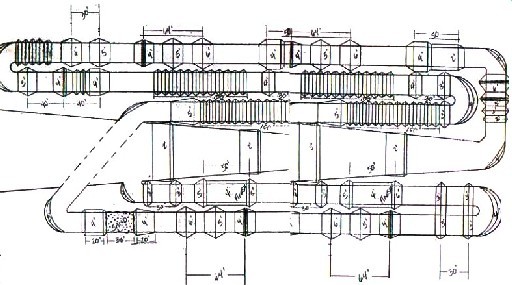
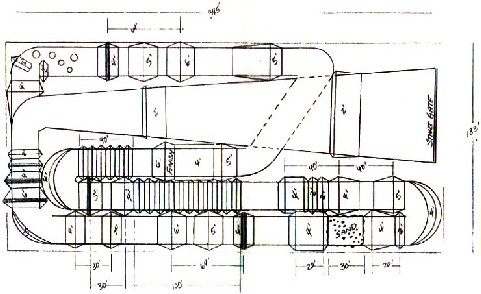
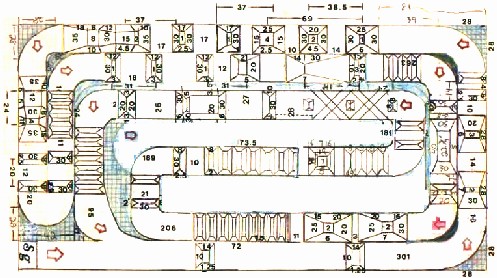
Sample Supercross tracks
The following are actual Supercross tracks used in Supercross events. The typical dimensions for the average stadium Supercross track are 200′ × 400′ for the outside rectangular border.